Saturday, February 18, 2012

Convert Your Blog From Blogger To Wordpress 12 Steps

  1. First and foremost, know the benefits of converting your blog from Blogger to Wordpress. See if the benefits worth the conversion for your blog.
  2. If you’ve decided to convert your blog or go for Wordpress, signup to have one. If you host your own blog, install the Wordpress blog into a directory other than your existing blog through the Fantastico feature of your web host. If you opt to install Wordpress manually, here is the Wordpress installation guide.
  3. After installation, sign in and access your Wordpress admin page. Select the Wordpress template you prefer. The popular templates are those with 2-column and 3-column designs. But, there are so many Wordpress themes or templates that will surely capture your heart.
  4. Choose the Wordpress widgets you love. Popular Wordpress widgets include Popular Posts, Recent posts, Recent Comments, Related Posts, Top Commentators, and also the money making widgets. These are only few of the Wordpress widgets that attract readers and make them navigate or participate in your blog discussions.
  5. Identify the Wordpress widgets and other blog sections you wanted to appear in your blog. Map these widgets and blog sections in your Wordpress template.
  6. Edit the Wordpress template to implement the widgets and other sections in your Wordpress blog. Choose the URL structure your prefer as discussed in my previous post, Top 5 Reasons to Convert Your Blog From Blogger to Wordpress. Test if your final template and design are working properly by clicking the links or navigating it.
  7. Before you may import your Blogger blog posts with externally-hosted Wordpress blog, edit first the blogger.php file in /wp-admin/import/. Delete the “2″ in www2.blogger.com.
  8. Convert your self-hosted Blogger blog into blogspot in Blogger Admin Settings with any available name. Better do it during the non-peak hours of your blog. When there are less visitors accessing your blog. Then, click Formatting in the Blogger Setting and change the post timestamp into mm/dd/yyyy hh:mm:ss AM/PM, the first option in drop-down menu. After that, click Archiving and set Archive Frequency to “monthly”. Then, import your Blogger blog posts and comments through the import link in your Wordpress blog Admin page. After importing, immediately convert your blogspot blog to its original state. This will minimize the inaccessibility of your original blog.
  9. Test your Wordpress blog again but having your own blog posts. Don’t forget to delete the sample post if you’ve not yet done so. Navigate your blog to ensure that everything is fine.
  10. If all are OK, backup your old Blogger blog and the new Wordpress blog. Then, edit your Wordpress blog base URL at Options in Admin page. Replace it with your original blog URL, either root or subdirectory. Here’s the details of moving Wordpress blog to another directory.
  11. If you original blog is in subdirectory, just change the name of that directory with a new one. Then, rename your Wordpress blog directory with your original . Then, type your blog URL in your web browser address window. You must be directed to your Wordpress blog.If your original blog is in the root directory, you need to delete your original blog files. To minimize or prevent your original blog being inaccessible, implement a temporary redirection to your Wordpress blog directory prior to deletion. Then, upload your Wordpress blog to the root directory where your original blog is located.
  12. Now, type your original blog URL in your web browser address bar and your Wordpress blog should appear. If everything is fine, you may delete or disable your Blogger blog permanently. Search engine robot access to your blog backup directory in your server must be disallowed using robots.txt to prevent duplicate content.
That’s it…Enjoy your Wordpress blog!

Example of Sqlite Database in Android

Example of Sqlite  Database in Android

Introduction

Android default Database engine is Lite. SQLite is a lightweight transactional database engine that occupies a small amount of disk storage and memory, so it's a perfect choice for creating databases on many mobile operating systems such as Android, iOS.
Things to consider when dealing with SQLite:
  1. Data type integrity is not maintained in SQLite, you can put a value of a certain data type in a column of another datatype (put string in an integer and vice versa).
  2. Referential integrity is not maintained in SQLite, there is no FOREIGN KEY constraints or JOIN statements.
  3. SQLite Full Unicode support is optional and not installed by default.
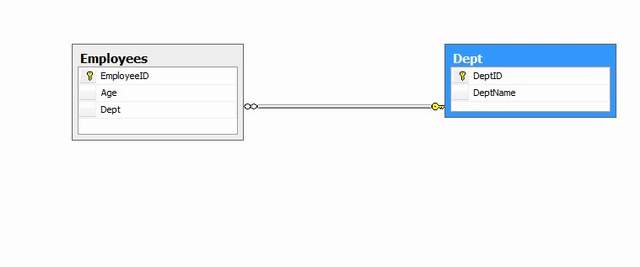
In this tutorial, we will create a simple database application to store employees data. the DB has:

Tables

  1. Employees
  2. Dept

Views

  1. ViewEmps: to display employees and their relative departments.
sqlitedb1.jpg

Creating SQLite Database

By default, SQLite on Android does not have a management interface or an application to create and manage databases from, so we're going to create the database ourselves by code. First, we will create a class that handles all the operations required to deal with the database such as creating the database, creating tables, inserting and deleting records and so on. The first step is to create a class that inherits from SQLiteOpenHelper class. This class provides two methods to override to deal with the database:
  1. onCreate(SQLiteDatabase db): invoked when the database is created, this is where we can create tables and columns to them, create views or triggers.
  2. onUpgrade(SQLiteDatabse db, int oldVersion, int newVersion): invoked when we make a modification to the database such as altering, dropping , creating new tables.
Our class will have the following members:
public class DatabaseHelper extends SQLiteOpenHelper {

static final String dbName="demoDB";
static final String employeeTable="Employees";
static final String colID="EmployeeID";
static final String colName="EmployeeName";
static final String colAge="Age";
static final String colDept="Dept";

static final String deptTable="Dept";
static final String colDeptID="DeptID";
static final String colDeptName="DeptName";

static final String viewEmps="ViewEmps";

The Constructor

public DatabaseHelper(Context context) {
  super(context, dbName, null,33); 
  }
The constructor of the super class has the following parameters:
  • Context con: The context attached to the database
  • dataBaseName: The name of the database
  • CursorFactory: Sometimes, we may use a class that extends the Cursor class to implement some extra validations or operations on the queries run on the database. In this case, we pass an instance of CursorFactory to return a reference to our derived class to be used instead of the default cursor. In this example, we are going to use the standard Cursor Interface to retrieve results, so the CursorFactory parameter is going to be null.
  • Version: the version of the schema of the database. The constructor creates a new blank database with the specified name and version.

Creating the Database

The first superclass method to override is onCreate(SQLiteDatabase db):
public void onCreate(SQLiteDatabase db) {
  // TODO Auto-generated method stub
  
  db.execSQL("CREATE TABLE "+deptTable+" ("+colDeptID+ " INTEGER PRIMARY KEY , "+
    colDeptName+ " TEXT)");
  
  db.execSQL("CREATE TABLE "+employeeTable+" 
    ("+colID+" INTEGER PRIMARY KEY AUTOINCREMENT, "+
        colName+" TEXT, "+colAge+" Integer, "+colDept+" 
    INTEGER NOT NULL ,FOREIGN KEY ("+colDept+") REFERENCES 
    "+deptTable+" ("+colDeptID+"));");
  
  
  db.execSQL("CREATE TRIGGER fk_empdept_deptid " +
    " BEFORE INSERT "+
    " ON "+employeeTable+
    
    " FOR EACH ROW BEGIN"+
    " SELECT CASE WHEN ((SELECT "+colDeptID+" FROM "+deptTable+" 
    WHERE "+colDeptID+"=new."+colDept+" ) IS NULL)"+
    " THEN RAISE (ABORT,'Foreign Key Violation') END;"+
    "  END;");
  
  db.execSQL("CREATE VIEW "+viewEmps+
    " AS SELECT "+employeeTable+"."+colID+" AS _id,"+
    " "+employeeTable+"."+colName+","+
    " "+employeeTable+"."+colAge+","+
    " "+deptTable+"."+colDeptName+""+
    " FROM "+employeeTable+" JOIN "+deptTable+
    " ON "+employeeTable+"."+colDept+" ="+deptTable+"."+colDeptID
    );
  //Inserts pre-defined departments
  InsertDepts(db);  
 }
The method creates tables with columns, a view and a trigger. The method is invoked when the database is created. So we create our table and specify the columns. This method is invoked when the database does not exist on the disk, it’s executed only once on the same device the first time the application is run on the device.

Upgrading the Database

Sometimes, we want to upgrade the database by changing the schema, add new tables or change column data types. This is done by overriding the onUpdate(SQLiteDatabase db,int old Version,int newVerison) method:
public void onUpgrade(SQLiteDatabase db, int oldVersion, int newVersion) {
  // TODO Auto-generated method stub
  
  db.execSQL("DROP TABLE IF EXISTS "+employeeTable);
  db.execSQL("DROP TABLE IF EXISTS "+deptTable);
  
  db.execSQL("DROP TRIGGER IF EXISTS dept_id_trigger");
  db.execSQL("DROP TRIGGER IF EXISTS dept_id_trigger22");
  db.execSQL("DROP TRIGGER IF EXISTS fk_empdept_deptid");
  db.execSQL("DROP VIEW IF EXISTS "+viewEmps);
  onCreate(db);
 }
This method is invoked when the version number specified in the constructor of the class changes.
When you want to append a change to your database, you must change the version number in the constructor of the class.
So when you pass the constructor a version number of 2:
public DatabaseHelper(Context context) {
  super(context, dbName, null,2);
  
  // TODO Auto-generated constructor stub
 }
instead of 1:
super(context, dbName, null,2);
the application understands that you want to upgrade the database and onUpgrade method will be invoked. A typical implementation of this method is to drop the tables and create them again with the additional modifications.

Managing Foreign-Key Constraints

We mentioned before that SQLite 3 by default does not support foreign key constraint, however we can force such a constraint using TRIGGERS: we will create a trigger that ensures that when a new Employee is inserted, his/her Dept value is present in the original Dept table. The SQL statement to create such a trigger would be like this:
CREATE TRIGGER fk_empdept_deptid Before INSERT ON Employees 
FOR EACH ROW BEGIN
    SELECT CASE WHEN ((SELECT DeptID FROM Dept WHERE DeptID =new.Dept ) IS NULL)
    THEN RAISE (ABORT,'Foreign Key Violation') END;
    END
In onCreate method, we created this trigger like this:
db.execSQL("CREATE TRIGGER fk_empdept_deptid " +
    " BEFORE INSERT "+
    " ON "+employeeTable+
    
    " FOR EACH ROW BEGIN"+
    " SELECT CASE WHEN ((SELECT "+colDeptID+" FROM "+deptTable+" _
    WHERE "+colDeptID+"=new."+colDept+" ) IS NULL)"+
    " THEN RAISE (ABORT,'Foreign Key Violation') END;"+
    "  END;");

Executing SQL Statements

Now let's begin executing basic SQL statements. You can execute any SQL statement that is not a query whether it is insert, delete, update or anything using db.execSQL(String statement) method like when we did when creating the database tables:
db.execSQL("CREATE TABLE "+deptTable+" ("+colDeptID+ " INTEGER PRIMARY KEY , "+
    colDeptName+ " TEXT)");

Inserting Records

We insert records to the database using the following code for example to insert records in the Dept table:
SQLiteDatabase db=this.getWritableDatabase();
 ContentValues cv=new ContentValues();
   cv.put(colDeptID, 1);
   cv.put(colDeptName, "Sales");
   db.insert(deptTable, colDeptID, cv);

   cv.put(colDeptID, 2);
   cv.put(colDeptName, "IT");
   db.insert(deptTable, colDeptID, cv);
                     db.close();
Notice that we need to call this.getWritableDatabase() to open the connection with the database for reading/writing. The ContentValues.put has two parameters: Column Name and the value to be inserted. Also, it is a good practice to close the database after executing statements.

Updating Values

To execute an update statement, we have two ways:
  1. To execute db.execSQL
  2. To execute db.update method:
public int UpdateEmp(Employee emp)
  {
   SQLiteDatabase db=this.getWritableDatabase();
   ContentValues cv=new ContentValues();
   cv.put(colName, emp.getName());
   cv.put(colAge, emp.getAge());
   cv.put(colDept, emp.getDept());
   return db.update(employeeTable, cv, colID+"=?", 
    new String []{String.valueOf(emp.getID())});   
  }
The update method has the following parameters:
  1. String Table: The table to update a value in
  2. ContentValues cv: The content values object that has the new values
  3. String where clause: The WHERE clause to specify which record to update
  4. String[] args: The arguments of the WHERE clause

Deleting Rows

As in update to execute a delete statement, we have two ways:
  1. To execute db.execSQL
  2. To execute db.delete method:
public void DeleteEmp(Employee emp)
  {
   SQLiteDatabase db=this.getWritableDatabase();
   db.delete(employeeTable,colID+"=?", new String [] {String.valueOf(emp.getID())});
   db.close();
  }
The delete method has the same parameters as the update method.

Executing Queries

To execute queries, there are two methods:
  1. Execute db.rawQuery method
  2. Execute db.query method
To execute a raw query to retrieve all departments:
Cursor getAllDepts()
  {
   SQLiteDatabase db=this.getReadableDatabase();
   Cursor cur=db.rawQuery("SELECT "+colDeptID+" as _id, 
 "+colDeptName+" from "+deptTable,new String [] {});
   
   return cur;
  }
The rawQuery method has two parameters:
  1. String query: The select statement
  2. String[] selection args: The arguments if a WHERE clause is included in the select statement
Notes
  1. The result of a query is returned in Cursor object.
  2. In a select statement if the primary key column (the id column) of the table has a name other than _id, then you have to use an alias in the form SELECT [Column Name] as _id cause the Cursor object always expects that the primary key column has the name _id or it will throw an exception .
Another way to perform a query is to use a db.query method. A query to select all employees in a certain department from a view would be like this:
public Cursor getEmpByDept(String Dept)
  {
   SQLiteDatabase db=this.getReadableDatabase();
   String [] columns=new String[]{"_id",colName,colAge,colDeptName};
   Cursor c=db.query(viewEmps, columns, colDeptName+"=?", 
 new String[]{Dept}, null, null, null);
   return c;
  }
The db.query has the following parameters:
  1. String Table Name: The name of the table to run the query against
  2. String [ ] columns: The projection of the query, i.e., the columns to retrieve
  3. String WHERE clause: where clause, if none pass null
  4. String [ ] selection args: The parameters of the WHERE clause
  5. String Group by: A string specifying group by clause
  6. String Having: A string specifying HAVING clause
  7. String Order By by: A string Order By by clause

Managing Cursors

Result sets of queries are returned in Cursor objects. There are some common methods that you will use with cursors:
  1. boolean moveToNext(): moves the cursor by one record in the result set, returns false if moved past the last row in the result set.
  2. boolean moveToFirst(): moves the cursor to the first row in the result set, returns false if the result set is empty.
  3. boolean moveToPosition(int position): moves the cursor to a certain row index within the boolean result set, returns false if the position is un-reachable
  4. boolean moveToPrevious(): moves the cursor to the previous row in the result set, returns false if the cursor is past the first row.
  5. boolean moveToLast(): moves the cursor to the lase row in the result set, returns false if the result set is empty.
There are also some useful methods to check the position of a cursor: boolean isAfterLast(), isBeforeFirst, isFirst, isLast and isNull(columnIndex). Also if you have a result set of only one row and you need to retrieve values of certain columns, you can do it like this:
public int GetDeptID(String Dept)
  {
   SQLiteDatabase db=this.getReadableDatabase();
   Cursor c=db.query(deptTable, new String[]{colDeptID+" as _id",colDeptName},
 colDeptName+"=?", new String[]{Dept}, null, null, null);
   //Cursor c=db.rawQuery("SELECT "+colDeptID+" as _id FROM "+deptTable+" 
   //WHERE "+colDeptName+"=?", new String []{Dept});
   c.moveToFirst();
   return c.getInt(c.getColumnIndex("_id"));  
  }
We have Cursor.getColumnIndex(String ColumnName) to get the index of a column. Then to get the value of a certain column, we have Cursor.getInt(int ColumnIndex) method.
Also there are getShort, getString, getDouble, getBlob to return the value as a byte array. It's a good practice to close() the cursor after using it.

How to Delete Table in Pl/Sql

DELETE Statement

The DELETE statement is used to delete rows in a table.

SQL DELETE Syntax

DELETE FROM table_name
WHERE some_column=some_value
Note: Notice the WHERE clause in the DELETE syntax. The WHERE clause specifies which record or records that should be deleted. If you omit the WHERE clause, all records will be deleted!

SQL DELETE Example

The "Employee" table:
P_Id LastName FirstName Address City
1 Hansen Ola Timoteivn 10 Sandnes
2 Svendson Tove Borgvn 23 Sandnes
3 Pettersen Kari Storgt 20 Stavanger
4 Nilsen Johan Bakken 2 Stavanger
5 Tjessem Jakob Nissestien 67 Sandnes
Now we want to delete the person "Tjessem, Jakob" in the "Persons" table.
We use the following SQL statement:
DELETE FROM Employee
WHERE LastName='Tjessem' AND FirstName='Jakob'
The "Employee" table will now look like this:
P_Id LastName FirstName Address City
1 Hansen Ola Timoteivn 10 Sandnes
2 Svendson Tove Borgvn 23 Sandnes
3 Pettersen Kari Storgt 20 Stavanger
4 Nilsen Johan Bakken 2 Stavanger


Delete All Rows

It is possible to delete all rows in a table without deleting the table. This means that the table structure, attributes, and indexes will be intact:
DELETE FROM table_name
or
DELETE * FROM table_name

Select Statement for SQL

PL/SQL SELECT Statement

Retrieve data from one or more tables, views, or snapshots.

Syntax:
SELECT [hint][DISTINCT] select_list
   INTO {variable1, variable2... | record_name}
   FROM table_list
   [WHERE conditions]
   [GROUP BY group_by_list]
   [HAVING search_conditions]
   [ORDER BY order_list [ASC | DESC] ]
   [FOR UPDATE for_update_options]
key:
select_list
A comma-separated list of table columns (or expressions) eg:
column1, column2, column3 
table.column1, table.column2
table.column1 Col_1_Alias, table.column2 Col_2_Alias
schema.table.column1 Col_1_Alias, schema.table.column2 Col_2_Alias
schema.table.*
*
expr1, expr2
(subquery [WITH READ ONLY | WITH CHECK OPTION [CONSTRAINT constraint]])
In the select_lists above, 'table' may be replaced with view or snapshot.
Using the * expression will return all columns.
If a Column_Alias is specified this will appear at the top of any column headings in the query output.
DISTINCT
Supress duplicate rows - display only the unique values.
Duplicate rows have matching values across every column (or expression) in the select_list.

INTO
A list of previously defined variables - there must be one variable for each item SELECTed - the results of the select statement are stored in these variables.
When SELECTing data INTO variables in this way the query must return ONE row.

FROM table_list
Contains a list of the tables from which the result set data is retrieved.
[schema.]{table | view | snapshot}[@dblink] [t_alias]
When selecting from a table you can also specify Partition and/or Sample clauses e.g.
[schema.]table [PARTITION (partition)] [SAMPLE (sample_percent)]
If the SELECT statement involves more than one table, the FROM clause can also contain join specifications (SQL1992 standard).

WHERE search_conditions
A filter that defines the conditions each row in the source table(s) must meet to qualify for the SELECT. Only rows that meet the conditions will be included in the result set. The WHERE clause can also contain inner and outer join specifications (SQL1989 standard). e.g.
WHERE tableA.column = tableB.column
WHERE tableA.column = tableB.column(+)
WHERE tableA.column(+) = tableB.column
GROUP BY group_by_list
The GROUP BY clause partitions the result set into groups.
The rows in each group having a unique value in group_by_list.
The group_by_list may be one or more columns or expressions and may optionally include the CUBE / ROLLUP keywords for creating crosstab results.
(note the groups will be in random order unless you additionally specify ORDER BY)
For example, the Order_Items table contains:
oi_shipping   oi_value   oi_units
ldn           89.75      2
ny            12.99      1
ldn           55.15      4
edi           23.00      6
A GROUP BY oi_shipping will partition the result set into the three groups: ldn, ny, edi
Heirarchical Queries
Any query that does *not* include a GROUP BY clause may include a CONNECT BY heirarchy clause:
[START WITH condition] CONNECT BY condition
HAVING search_conditions
An additional filter - the HAVING clause acts as an additional filter to the grouped result rows - as opposed to the WHERE clause that applies to individual rows. The HAVING clause is most commonly used in conjunction with a GROUP BY clause.

ORDER BY order_list [ ASC | DESC ] [ NULLS { FIRST | LAST } ]
The ORDER BY clause defines the order in which the rows in the result set are sorted. order_list specifies the result set columns that make up the sort list. The ASC and DESC keywords are used to specify if the rows are sorted ascending (1...9 a...z) or descending (9...1 z...a).
You can sort by any column even if that column is not actually in the main SELECT clause. If you do not include an ORDER BY clause then the order of the result set rows will be unpredictable (random or quasi random).

FOR UPDATE options - this locks the selected rows (Oracle will normally wait for a lock unless you specify NOWAIT)

Cursors are often used with a SELECT FROM ... FOR UPDATE [NOWAIT]
Specifying NOWAIT will exit with an error if the rows are already locked by another session.
Because the locks are not released until the end of the transaction you should not 'commit across fetches' from an explicit cursor if FOR UPDATE is used.

FOR UPDATE [OF [ [schema.]{table|view}.] column] [NOWAIT]

DECLARE
   CURSOR ... IS
      SELECT ..FROM...WHERE...
      FOR UPDATE OF ... NOWAIT;
Writing a SELECT statement
The clauses (SELECT ... FROM ... WHERE ... HAVING ... ORDER BY ... ) must be in this order.
The position of commas and semicolons is not forgiving
Each expression must be unambiguous. In other words if the FROM clause includes 2 columns with the same name, then both column names must be prefixed with the tablename (or view name).
SELECT DISTINCT
        customer_id,
        oi_ship_date
    FROM
        customers
        order_items  
    WHERE
        customers.customer_id = order_items.customer_id
        AND order_items.oi_ship_date > '01-may-2001';
If the table and view names themselves must be qualified with the schema (scott.t_customers.customer_id,) then this can become rather verbose. This syntax can be greatly simplified by assigning a table_alias (sometimes also known as a range variable or correlation name).

The fully qualified table has to be specified only in the FROM clause. All other table or view references can then use the alias name. e.g.
SELECT DISTINCT
        cst.customer_id, 
        cst.customer_id,
        ord.oi_ship_date
    FROM
        customers cst
        order_items ord
    WHERE
        cst.customer_id = ord.customer_id
        AND ord.oi_ship_date > '01-may-2001';

What is Cursor in Pl/Sql ?

What are Cursors?

A cursor is a temporary work area created in the system memory when a SQL statement is executed. A cursor contains information on a select statement and the rows of data accessed by it. This temporary work area is used to store the data retrieved from the database, and manipulate this data. A cursor can hold more than one row, but can process only one row at a time. The set of rows the cursor holds is called the active set.
There are two types of cursors in PL/SQL:

Implicit cursors:

These are created by default when DML statements like, INSERT, UPDATE, and DELETE statements are executed. They are also created when a SELECT statement that returns just one row is executed.

Explicit cursors:

They must be created when you are executing a SELECT statement that returns more than one row. Even though the cursor stores multiple records, only one record can be processed at a time, which is called as current row. When you fetch a row the current row position moves to next row.
Both implicit and explicit cursors have the same functionality, but they differ in the way they are accessed.

Implicit Cursors:

When you execute DML statements like DELETE, INSERT, UPDATE and SELECT statements, implicit statements are created to process these statements.
Oracle provides few attributes called as implicit cursor attributes to check the status of DML operations. The cursor attributes available are %FOUND, %NOTFOUND, %ROWCOUNT, and %ISOPEN.
For example, When you execute INSERT, UPDATE, or DELETE statements the cursor attributes tell us whether any rows are affected and how many have been affected.
When a SELECT... INTO statement is executed in a PL/SQL Block, implicit cursor attributes can be used to find out whether any row has been returned by the SELECT statement. PL/SQL returns an error when no data is selected.
The status of the cursor for each of these attributes are defined in the below table. 
Attributes
Return Value
Example
%FOUND
The return value is TRUE, if the DML statements like INSERT, DELETE and UPDATE affect at least one row and if SELECT ….INTO statement return at least one row.
SQL%FOUND
The return value is FALSE, if DML statements like INSERT, DELETE and UPDATE do not affect row and if SELECT….INTO statement do not return a row.
%NOTFOUND The return value is FALSE, if DML statements like INSERT, DELETE and UPDATE at least one row and if SELECT ….INTO statement return at least one row.
SQL%NOTFOUND
The return value is TRUE, if a DML statement like INSERT, DELETE and UPDATE do not affect even one row and if SELECT ….INTO statement does not return a row.
%ROWCOUNT Return the number of rows affected by the DML operations INSERT, DELETE, UPDATE, SELECT SQL%ROWCOUNT

For Example: Consider the PL/SQL Block that uses implicit cursor attributes as shown below:
DECLARE  var_rows number(5);
BEGIN
UPDATE employee 
SET salary = salary + 1000;
IF SQL%NOTFOUND THEN
dbms_output.put_line('None of the salaries where updated');
ELSIF SQL%FOUND THEN
var_rows := SQL%ROWCOUNT;
dbms_output.put_line('Salaries for ' || var_rows || 'employees are updated');
END IF; 
END; 
In the above PL/SQL Block, the salaries of all the employees in the ‘employee’ table are updated. If none of the employee’s salary are updated we get a message 'None of the salaries where updated'. Else we get a message like for example, 'Salaries for 1000 employees are updated' if there are 1000 rows in ‘employee’ table.

Share

Twitter Delicious Facebook Digg Stumbleupon Favorites More